APPLICATIONS

Revolutionary In-floor
heating for Laminate and
Luxury Vinyl Flooring

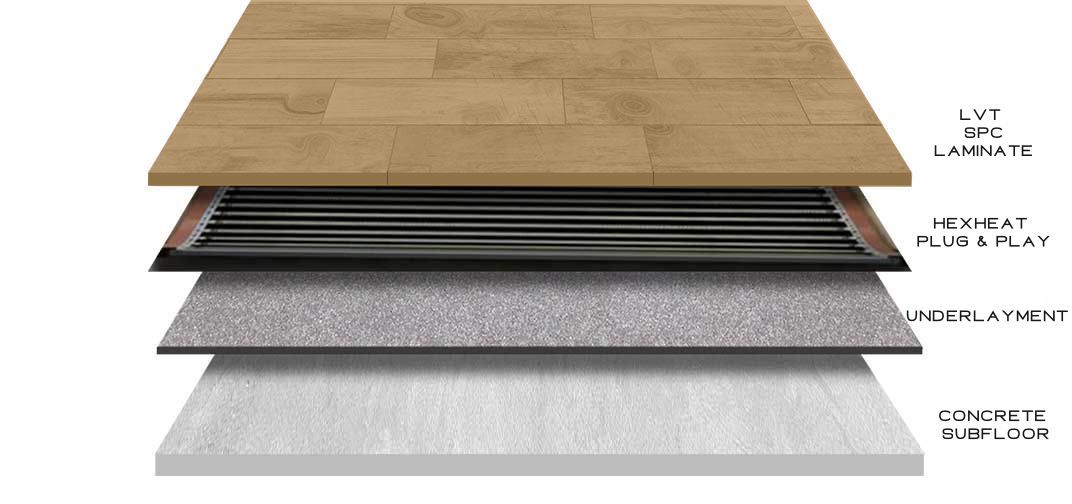
The HexHeat Plug & Play's far infrared heating film technology is unique to classic heating cables or heating mats, as set up and installation times is greatly diminished as it does not require many additional steps and materials to install. The intuitive plug & play system is designed specifically as a ready made assembly out of the box to be installed seamlessly for use under floors that were previously unattainable with other systems. HexHeat Plug and Play provides many advantages as it provides uniform heat through out the entire space and is 60% more efficient than traditional cable systems. HexHeat Plug & Play can be installed in basements on concrete sub-floors or any other level of the house on plywood sub-floors.
Concrete subfloor Assembly
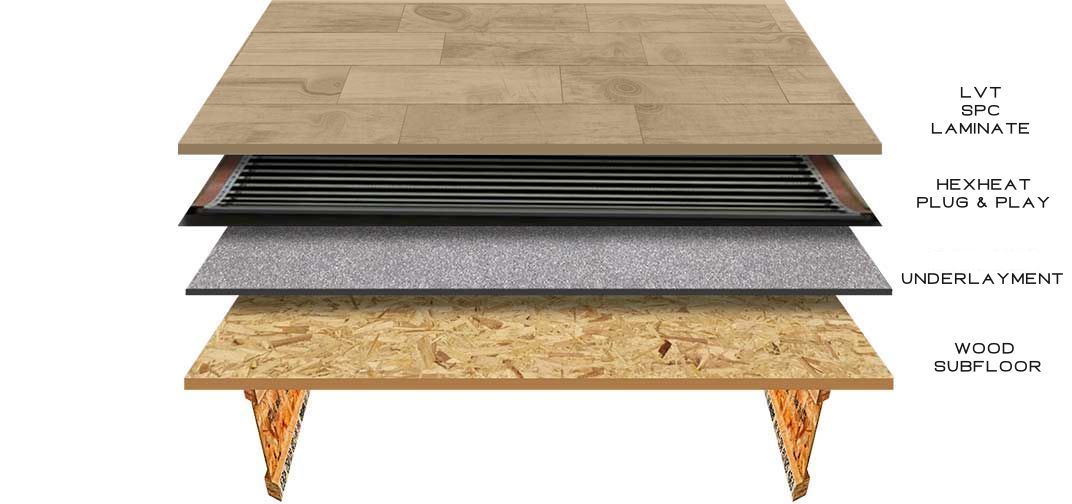
wood subfloor Assembly
hexcore_hexheat_orange_check_icon_dark
Tile Setters
Now every other room is now available to provide revenue from installations or sales of both the HexHeat technology and laminate flooring.
hexcore_hexheat_orange_check_icon_dark
Floor Layers
You can now provide heat applications for every project moving forward including applications where it was never thought possible, like a cold upstairs bedroom
hexcore_hexheat_orange_check_icon_dark
General Contractors
You are now able to expand yourproject scope to include in-floor heating in virtually any room of a house and your commercial projects.
hexcore_hexheat_orange_check_icon_dark
Renovation Contractors
You can replace baseboard heaters as this technology provides uniform heat throughout the entire room rather than relying on the circulation of air to heat the rest of the room.
hexcore_hexheat_orange_check_icon_dark
Electrical Contractors
You can now provide your customers a circuit for the thermostat, and install the heating film prior to the floor layers coming in.
Areas to utilize the most efficient full room heating system

One of the best cases for using HexHeat Plug & Play is to replace inefficient baseboard heaters.
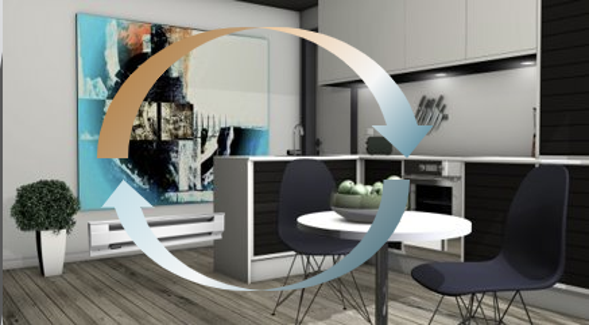
Baseboard heaters are usually installed on the exterior walls under a window, which is typically the coldest area of the room, and the thermostat is located on an interior wall across the room. This creates varied temperatures across the room as it relies on heating the air and not efficient as the heater is constantly cycling on and off.
The far infrared carrier waves heat the room uniformly and provides the sensation of the warm sun on your body. Once it reaches the optimum temperature, it uses very little energy to maintain this uniform heat throughout the area.

Room Layouts

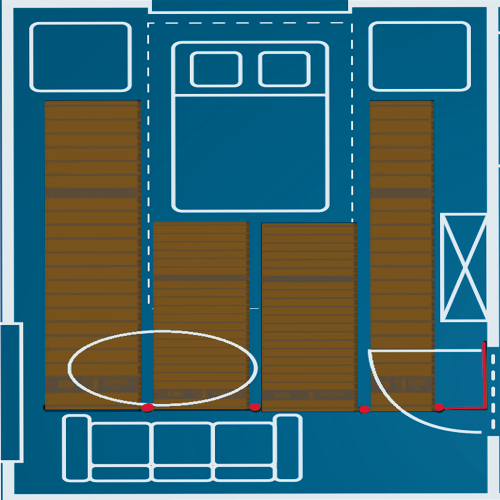
BEDROOM 10'X15' Example Layout
Your clients will enjoy waking up, getting out of bed and feeling a comfortable warmth all around them. There is no need to fear the cold air outside of your cozy blankets.

2@ 1OOCM X 3M
1@ 100CM X 5M
1 @ 60CM X 5M
1@ Cold Lead
1 @ Extension Cable
1 @ Thermostat

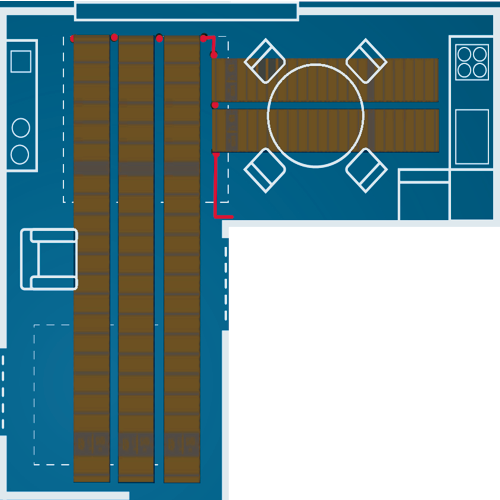
LIVING ROOM 14' X 16'
Is the living room too large for your baseboards to effectively heat this space?  By using HexHeat, you can provide a comfortable uniform heat through out this large space.

3 @ 100CM X 5M
2 @ 100cm x 3M
1 @ Cold Lead
2 @ Extension Cable
1 @ Thermostat

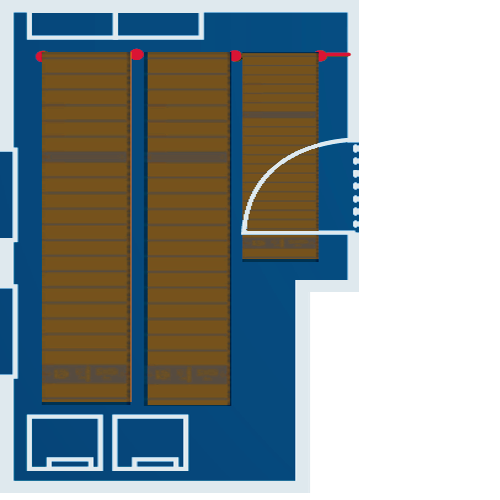
OFFICE 10'X12'
As people spend more time working from home, we want them to do so in comfort.  HexHeat helps maintain a constant uniform temperature.

2 @ 1OOCM X 5M
1 @ 100CM X 3M
1 @ Thermostat

HALLWAY 4' X 15'
Easily add heat down the middle of your hallway to reduce drafts and generate whole home warmth.

1 @ 1OOCM X 5M
1 @ Thermostat

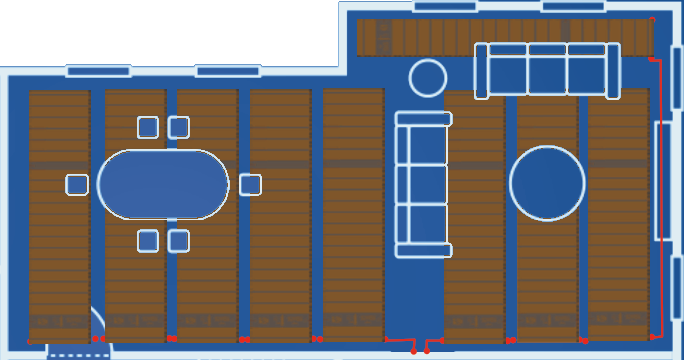
Basement Rec Room 15' X 30'
HexHeat Plug & Play is perfectly suited in basement environments where it helps eliminate dampness, mildew, and odors, while also projecting heat up for the rest of the home.

8 @ 1OOCM X 5M
1@ 60CM x 5M
3M HexHeat Extension Cable

2 Circuits controlled with
1 @ Thermostat
1 @ Power Module

Sunroom 15' x 20'
Turn your sunroom into a year-round living space. It can be very difficult to deliver forced air heating in your sunroom addition. Space heaters are very inefficient and potentially dangerous. The HexHeat Plug & Play is a perfect solution to extend the use and the comfort of the room year-round.

1 @ 1OOCM X 7M
2@ 100CM x 5M
1@ 100cm x 3M
1 @ Thermostat

Install in 3 basic steps

HexHeat Plug & Play, is the only patented far infrared in-floor Heat Film . As a result of our patented connectors, HexHeat Plug & Play Heat Film has revolutionized the far infrared in-floor heat installation.

  1. Install Underlayment
    • Clean and prep floor
    • Layout and secure underlayment
  2. Install Heating Film
    • Roll out and cut to length each roll of heat film
    • Connect the films together
    • Install UL Certified In-Floor Radiant Thermostat
    • Perform OHM test to ensure product was not damaged during install
  3. Install Finished Floor
    • Test the floor heat and enjoy
Make sure to cut out and sink the connector into the underlayment so the flooring can be laid flush on top.

Let's expand on the installation procedure a little further

HexHeat Plug and Play is an intuitive ready-made assembly that is simple and quick to install

A typical 10 x 15 bedroom can have laminate flooring installed in about 2 to 3 hours. The additional time to install HexHeat Plug & Play is approximately 1 hour or less.

Installation Steps

1 Clean and Prep the floor
Ensure the floor is clear of all dust and debris. Make sure it is flat and smooth.
2 Laydown underlayment
Install the underlayment to manufactures specifications. We suggest at least a 5mm to 8mm thick underpad to help with the thickness of the connector and provide insulation and cushioning for the finished flooring
3 Roll out the HexHeat Plug and Play
Roll out the HexHeat, keeping it 6" away from the walls and cut to length as needed along the allocated cut lines
4 Plug and connect the films together
Using the HexHeat patented connectors, plug each roll of film together. Cap the last roll with the included connector cap
5 Install the Cold Lead
From the first roll of film, up the wall to the thermostat junction box.
6 Test the resistance
Before installing the thermostat, test and record the resistance for the warranty
7 Sink the connectors into the underlayment
Carefully mark out the locations of the connectors and wires. Cut out the underlayment in these areas. The connectors must sit flush with the floor. If needed, you may have to grind out some subfloor for the connector to seat all the way flush.
8 Secure the heat film to the floor
Now that the connectors and wires sit flush in the floor, place tape over them to keep them securely in place. Also tape the edges and ends of the film down to the floor to ensure they stay in place during the installation of the finished floor. There must be a 1cm space between each roll of film. Do not overlap the film.
9 Connect the thermostat
Included with the thermostat, is a floor temperature sensor. This must be installed under the flooring. Install the sensor under the first row of film about a foot away from the edge directly under the carbon area of the film. Now connect the thermostat to manufactures specifications
10 Test the HexHeat Film
Now that the thermostat is connected, and installed, turn on the system and test for functionality. Confirm there are no errors reading on the thermostat, and that the heat film is functioning properly.
11 Install your finished Floor
Turn off the power to the thermostat and heating system. You can now proceed to install your Laminate, LVT or SPC flooring directly on top of the heating film.
12 Finish
Install your baseboards, being careful to not nail where the wires lead from the floor to the thermostat. Turn on your system and you can enjoy the warmth of a finished floor right away. The heat film is designed to come up to temperature slowly, so give it some time, but soon you will have a cozy space.

Download Our Heating Film
Installation Manual